Eks Power Up!

AWS EKS:
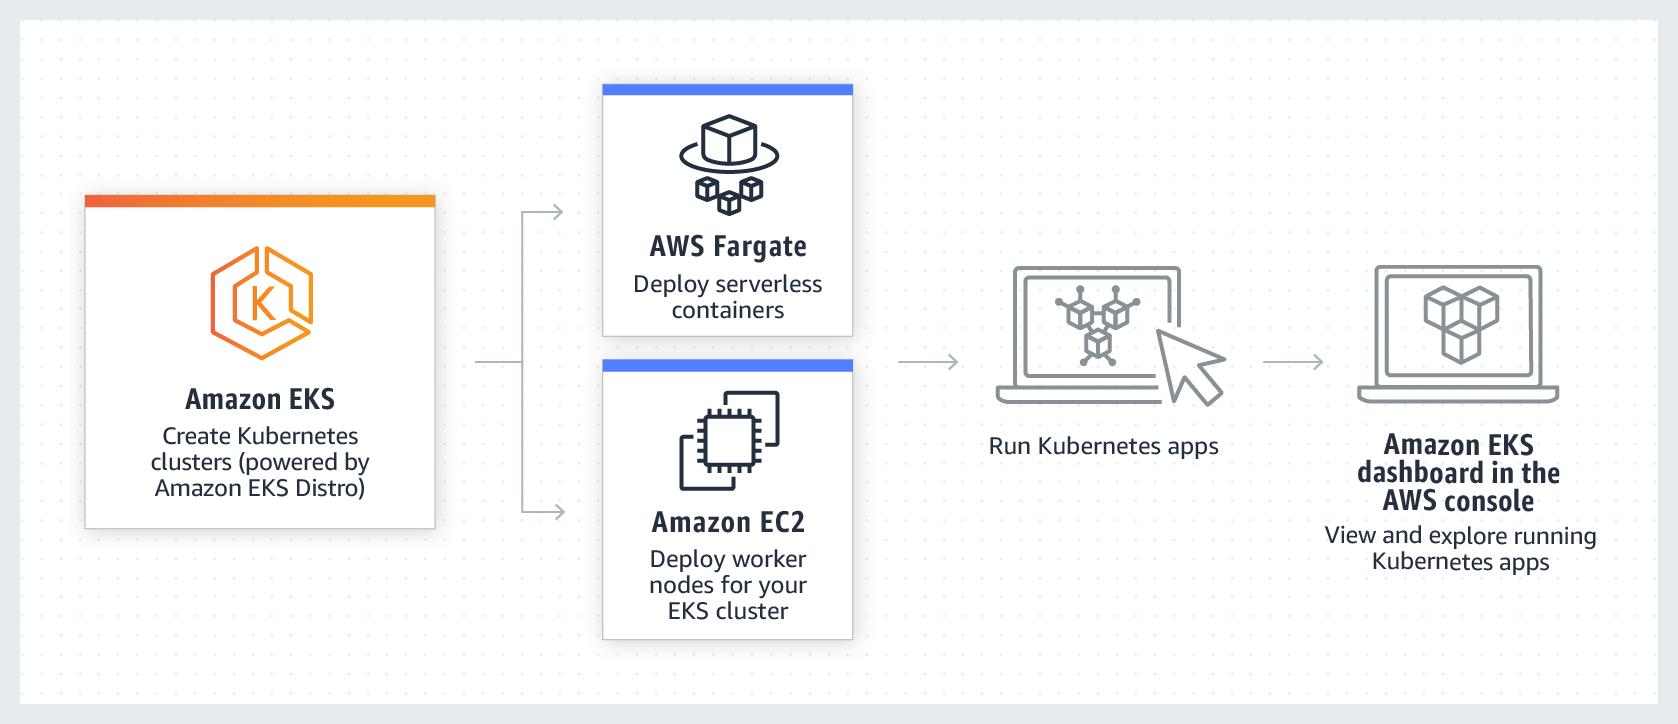
Hey there! So, you know Amazon Elastic Kubernetes Service, right? It's like your Kubernetes bestie, managing the whole shebang in the AWS cloud and even in your on-premise digs. Picture this: in the cloud, Amazon EKS is like your personal assistant, juggling all those Kubernetes control plane nodes. They're the unsung heroes, dealing with container schedules, keeping your apps available, and handling cluster data like a boss. And guess what? You get to ride the AWS boat packed performance, scalability, reliability, and availability, plus sweet integrations with AWS networking and security services. Amazon EKS is the friend your applications didn't know they needed! 🚀✨
Karpenter
Hi, so let me spill the beans on Karpenter—it's like having your own cloud genie! You know how Cluster Autoscaler does this cool dance, adjusting your server party size? Well, Karpenter takes it up a notch. It's like the intelligent planner, not just resizing the party, but also figuring out the best spots to set up your servers for max efficiency. So, instead of just following the beat like Cluster Autoscaler, Karpenter is the party maestro making sure everything's groovy! 🎉✨
For more details look here -- Karpenter
But in this blog we will be using simple Cluster Autoscaler.Github
First download:
-
Lets us first wield all the weapons we need.
apiVersion: eksctl.io/v1alpha5
kind: ClusterConfig
metadata:
name: emreksproject
region: us-east-1
version: "1.27"
iam:
withOIDC: true
serviceAccounts:
- metadata:
name: cluster-autoscaler
namespace: kube-system
attachPolicy:
Version: "2012-10-17"
Statement:
- Effect: Allow
Action:
- "autoscaling:DescribeAutoScalingGroups"
- "autoscaling:DescribeAutoScalingInstances"
- "autoscaling:DescribeLaunchConfigurations"
- "autoscaling:DescribeTags"
- "autoscaling:SetDesiredCapacity"
- "autoscaling:DescribeInstances"
- "autoscaling:TerminateInstanceInAutoScalingGroup"
- "ec2:DescribeLaunchTemplateVersions"
- "ec2:DescribeInstanceTypes"
Resource: "*"
managedNodeGroups:
- name: myNodeGroupMyConfigurations #my node group name and instances to use
instanceTypes: ["m5.xlarge", "m5a.xlarge", "m5d.xlarge", "m5ad.xlarge", "m4.xlarge", "m5n.xlarge", "m5dn.xlarge"]
spot: true # this is to use spot instance to keep it economical
minSize: 1
maxSize: 10
desiredCapacity: 1
volumeSize: 40 # each node in the managed node group will have an attached EBS volume with a size of 40 gigabytes.
availabilityZones: ["us-east-2a"]
labels:
lifecycle: Ec2Spot
intent: control
aws.amazon.com/spot: "true"
tags: # necessary
k8s.io/cluster-autoscaler/enabled: "true"
k8s.io/cluster-autoscaler/analytics-k8s: "owned"
k8s.io/cluster-autoscaler/node-template/label/lifecycle: Ec2Spot
k8s.io/cluster-autoscaler/node-template/label/intent: control
k8s.io/cluster-autoscaler/node-template/label/aws.amazon.com/spot: "true"
privateNetworking: true
iam:
attachPolicyARNs:
- arn:aws:iam::aws:policy/AmazonEKSWorkerNodePolicy
- arn:aws:iam::aws:policy/AmazonEKS_CNI_Policy
- arn:aws:iam::aws:policy/AmazonEC2ContainerRegistryReadOnly
- arn:aws:iam::aws:policy/AmazonSSMManagedInstanceCore
- <replace with ARN of access to S3 for our spark jobs> 🤦♀️🤦♀️🤢 #don't get confused though check below!
preBootstrapCommands: # Executes pre-bootstrap commands on each node, such as installing the SSM agent
- yum install -y amazon-ssm-agent
- systemctl enable amazon-ssm-agent && systemctl start amazon-ssm-agent
Here is an example Coudformation script of Policy to attach. You get the complete S3 access after creating this policy
AnalyticsPolicy:
  Type: 'AWS::IAM::ManagedPolicy'
  Properties:
    Description: Policy you can attach to EKS
    Path: /
    PolicyDocument:
      Version: 2024-01-09
      Statement:
        - Effect: Allow
          Action:
            - "s3:*"
          Resource:  // S3 bucket paths 🙂
            - "arn:aws:s3:::my bucket 1/*"
            - "arn:aws:s3:::my bucket 1"
Support if things doesn't work out!!
https://archive.eksworkshop.com/beginner/080_scaling/deploy_ca/
https://www.youtube.com/watch?v=2TC9V2-XRX0
When Ready!!!
eksctl create cluster -f myeconomicalekscluster.yaml
# Yes Please paste the above code in the your
# preferred file don't mess the extension 😒
VOLA! YOUR EKS CLUSTER IS READY POWERED WITH CLUSTER AUTOSCALER
FOR TERRAFORM NERDS 🙄:
EKS Cluster Subnets (
eks_cluster):The
subnetsattribute in theeks_clusterresource specifies the subnets where EKS control plane components will be launched.These subnets should be public subnets to allow communication with AWS services like Amazon S3, CloudWatch, and the internet.
Node Group Subnets (
aws_eks_node_group):The
subnetsattribute in theaws_eks_node_groupresource specifies the subnets where the worker nodes will be launched.These subnets can be private or public based on your requirements. If the worker nodes need direct internet access for pulling container images, you might choose public subnets.
imp: Below is just an example please customize as per your requirements. 😶 People with no Idea, 🚩ignore, skip!
🚨Anyhow: eksctl way is recommended.
resource "aws_subnet" "public_subnet_1" {
vpc_id = "your-vpc-id"
cidr_block = "10.0.1.0/24"
availability_zone = "us-east-2a"
map_public_ip_on_launch = true
}
resource "aws_subnet" "public_subnet_2" {
vpc_id = "your-vpc-id"
cidr_block = "10.0.2.0/24"
availability_zone = "us-east-2b"
map_public_ip_on_launch = true
}
resource "aws_subnet" "private_subnet_1" {
vpc_id = "your-vpc-id"
cidr_block = "10.0.3.0/24"
availability_zone = "us-east-2a"
map_public_ip_on_launch = false
}
resource "aws_subnet" "private_subnet_2" {
vpc_id = "your-vpc-id"
cidr_block = "10.0.4.0/24"
availability_zone = "us-east-2b"
map_public_ip_on_launch = false
}
provider "eks" {
region = "us-east-2"
}
resource "eks_cluster" "analytics_k8s" {
name = "analytics-k8s"
subnets = [aws_subnet.public_subnet_1.id, aws_subnet.public_subnet_2.id]
vpc_config {
subnet_ids = [aws_subnet.public_subnet_1.id, aws_subnet.public_subnet_2.id]
}
}
resource "aws_eks_node_group" "analytics_4vcpu_16gb_spot" {
cluster_name = eks_cluster.analytics_k8s.name
node_group_name = "analytics-4vcpu-16gb-spot"
instance_types = ["m5.xlarge", "m5a.xlarge", "m5d.xlarge", "m5ad.xlarge", "m4.xlarge", "m5n.xlarge", "m5dn.xlarge"]
capacity_type = "SPOT"
min_size = 1
max_size = 20
desired_capacity= 1
key_name = "your-key-pair-name"
subnets = [aws_subnet.private_subnet_1.id, aws_subnet.private_subnet_2.id]
labels = {
lifecycle = "Ec2Spot"
intent = "control"
"aws.amazon.com/spot" = "true"
}
tags = {
"k8s.io/cluster-autoscaler/enabled" = "true"
"k8s.io/cluster-autoscaler/analytics-k8s" = "owned"
"k8s.io/cluster-autoscaler/node-template/label/lifecycle" = "Ec2Spot"
"k8s.io/cluster-autoscaler/node-template/label/intent" = "control"
"k8s.io/cluster-autoscaler/node-template/label/aws.amazon.com/spot" = "true"
}
private_networking = true
node_group_iam_role {
policies = [
"arn:aws:iam::aws:policy/AmazonEKSWorkerNodePolicy",
"arn:aws:iam::aws:policy/AmazonEKS_CNI_Policy",
"arn:aws:iam::aws:policy/AmazonEC2ContainerRegistryReadOnly",
"arn:aws:iam::aws:policy/AmazonSSMManagedInstanceCore",
<replace with ARN of access to S3 for our spark jobs>, 🤦♀️🤦♀️🤢 #don't get confused though check below!
]
}
scaling_config {
desired_size = 1
max_size = 20
min_size = 1
}
remote_access {
ec2_ssh_key = "your-key-pair-name"
}
provisioner "remote-exec" {
inline = [
"yum install -y amazon-ssm-agent",
"systemctl enable amazon-ssm-agent && systemctl start amazon-ssm-agent",
]
}
}
Please make sure, all the resource dependency have been created before
Node Group Scaling Configuration: Adjust the
scaling_configblock according to your scaling requirements.Remote Access: Confirm that the SSH key specified in
ec2_ssh_keyis valid and corresponds to the key pair you want to use.Provisioner Block: The
remote-execprovisioner is used for executing commands on the EC2 instances. Ensure that the specified commands are suitable for your use case.
After making these adjustments, you can run
>> terraform init
>> terraform plan
>> terraform apply
Install Cluster Autoscaler

Let’s install the Cluster Autoscaler, so our cluster will scale to meet our BigData needs!
Just like we did earlier, follow the commands to install CA using helm:
>     helm repo add autoscaler https://kubernetes.github.io/autoscaler

>     helm repo update

>     helm install cluster-autoscaler autoscaler/cluster-autoscaler
    --namespace kube-system --set 'autoDiscovery.clusterName'=analytics-k8s
    --version 1.27.3

-----------------------------comments-------------------------------------------
# Here we have installed cluster autoscaler of type
autodiscovery with version 1.27.3
# use the same kind of version of autoscaler as
the EKS or else there will be issues🤢
Documentation:
https://github.com/kubernetes/autoscaler/tree/master/cluster-autoscaler/cloudprovider/aws
Check version and relases suitable for your project:
https://github.com/kubernetes/autoscaler/releases
You can install whatever you want on top of your cluster, make sure you know what you are doing. Like for the upcoming project I will just install a Spark operator.
Install Spark Operator
We can now install Spark Operator in our brand new cluster with the following commands:
>   helm repo add spark-operator
    https://googlecloudplatform.github.io/spark-on-k8s-operator

>    helm repo update

>    helm install spark-operator spark-operator/spark-operator
    --namespace spark-operator --create-namespace --set sparkJobNamespace=default
So here we just:
Used helm CLI to add a new public repository
Updated all our local configured repositories
Used helm CLI again to install the Spark Operator chart (think that chart is an application, on this case is the Spark Operator itself), on the Kubernetes namespace spark-operator, with the latest version of the chart available (if we don’t specify a version, this is the default behavior) and watching our Spark Jobs (that we will create very soon) on the namespace default.
After a couple of minutes, run the following command to check if Spark Operator was installed successfully (you should see the spark-operator Pod listed):
kubectl get pod -n spark-operator
Cleaning Up Don't Forget this!🚨🚩🌋
Please don’t forget to delete the resources created by this tutorial! Follow the command to delete all resources created by eksctl:
> eksctl delete cluster -w -f eks-cluster.yaml
# Those who created infrastructure with terraform
> terraform destroy
Thanks for reading, Adiós !


